Speed controller for model boats
This AN is submitted by Alonzo Trueland.
Download source code
RC SPEED CONTROLLER
BASIC DESCRIPTION
This
application note describes a circuit designed to control the speed of a dc motor
used in radio-controlled boats. The electronic speed controller (ESC) is a no-brake, forward-only
controller. I wanted to keep the part count low and the circuit simple so a couple
features were sacrificed. The circuit does not have: over-current protection, over-temp protection,
polarity protection, or over/under voltage protection. All the parts can be obtained from digikey distributors. The circuit was designed with a popular 12-cell model boat motor in mind
(graupner speed 700). This project was my first attempt at using Bascom-avr and Atmel
microcontrollers.
CIRCUIT
DESCRIPTION
The
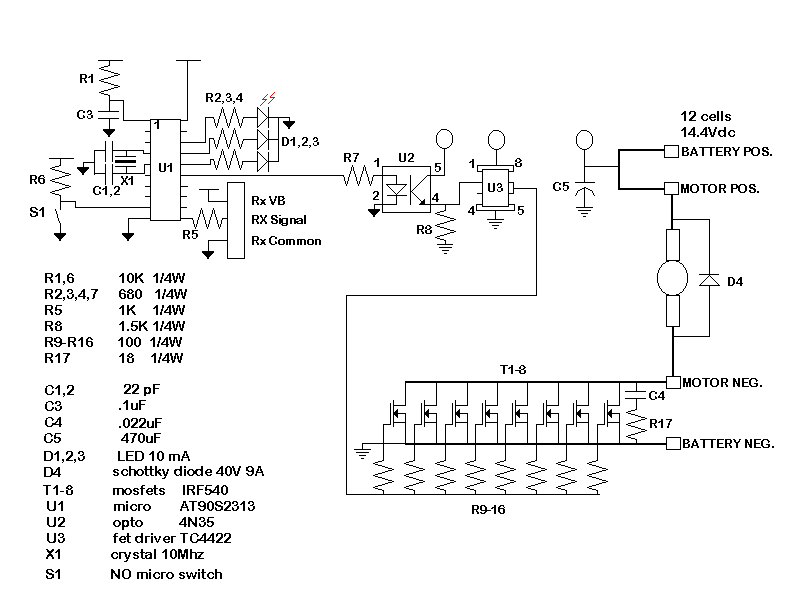
ESC is designed around an Atmel AT90S2313 microcontroller. I chose to build the circuit on two separate boards, a digital control
board, and a FET driver board. The digital control section is powered by 4.8-6Vdc from the receiver and
the FET driver section is powered by 12 NiCad cells (14.4Vdc).
The
ESC receives the 1-2mS pulses from the receiver and converts it into a 2400Hz
PWM signal that drives the FET board controlling the motor. The AT90S2313 converts the receiver signal into the motor drive signal
then feeds it into an opto-isolator. The isolator converts the logic level signal into the 14.4Vdc signal
needed for FET operation. The signal is then fed into a 9A FET driver chip. The FET driver is responsible for providing the short high current pulses
needed to overcome gate capacitance. Three LEDS and a button are used for
calibrating/arming the controller.
SOFTWARE
DESCRIPTION
The
software begins by calculating the center and full forward values. A button is pushed when the transmitter stick is at center and once again
when the stick is full forward. These values are stored as Dbf and C. After storing the center and forward values, the software waits for the
stick to return to center before arming the circuit. The armed led will come on after the stick is returned to center. Next a continuous loop of measuring the RX signal and updating the PWM
drive signal is performed. IF two consecutive pulses are missed, the mispulse routine will
turn off the motor drive.
OPERATION
1. Connect receiver to the ESC
receiver connections.
2.
Connect motor to the ESC motor connections.
3. Connect battery to the ESC battery connections.
4. Turn on receiver switch. Two ESC
LEDs should be on.
5. Turn on transmitter.
6.
Press the calibrate button once with the transmitter in a neutral position. Center LED should go out.
7. Press the calibrate button once
again with the transmitter in a full-forward position. The forward LED should go out.
8. Return transmitter to a neutral
position. The
Armed LED should go on. The speed controller is ready.
FINAL
NOTES
I
chose to build the circuit using point-to-point because of the relatively low
parts count and large wires needed for current handling. The thick traces on the schematic represent where 12 gage wire should be
used. Circuit layout and packaging is left to the builder. I chose to use IRF540s for convenience and price. The number and quality of FETs can be changed to meet the demands of the
builder, but must be N-type and rated for 100Vdc. The use of a heat sink is
recommended. In
model boats it is common to water-cool the FETs. The number, quality, and
cooling efficiency of the FETs will determine current capability. Because this
circuit does not include some safety features that you would find on a
commercial unit, the builder/operator should exercise caution when experimenting
with this device.
DISCLAIMER
This
information is for experimental use only. I do not assume any responsibility for injury or damages resulting from
the use of any information found in this application note. |